How-to
[VIDEO] How to Assemble the Brinly STS-427LXH Tow-behind Lawn Sweeper
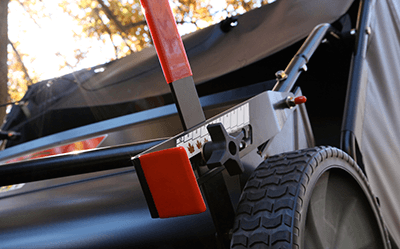
In our ever-continuing effort to bring you the best product support in the industry, we’ve posted another assembly video to our YouTube Channel. The newly redesigned STS-427LXH 42″ tow-behind lawn sweeper is our latest target. The STS-427LXH’s most distinguishing feature is the side-mounted Twist-Lock Height Adjustment. Differing from the previous iteration’s center-mounted height adjustment, the “427” makes accessing the height adjustment lever easier by moving it out and away from the tow bar. The all-new Twist-Lock knob also prevents the lever from being jarred loose over bumpy terrain, securing tightly on one of the 10 settings which range from short grass to thick leaves. Effective for collecting both wet and dry grass clippings, the Brinly 42″ tow-behind lawn sweeper can be used virtually all year long. >>More Information
This looks to be a much-improved design. My old Brinly finally bit the dust after many years of hard use! I wish I had known this video was available before assembly with manual only. The manual didn’t address affixing the wind straps. Tips for the hamper frame would have helped, too. I still have extra parts (panels 8 and 9 – round head screws, lock nuts, and plugs) that were not addressed in the manual or this video. Information on that?
Hi Nancy,
Thank you for the feedback! Regarding your extra parts, the “skin pack” for your STS-427LXH sweeper is also the same skin pack that is used in the STH-420BH sweeper as well. You did assemble it correctly; those excess parts are simply for use with the other model. Thanks again and let me know if you have any other questions!
Thanks for the info on panels 8 & 9, they also had me going through the manual again searching for the instructions that I missed. The packaging and instructions made the job fairly easy. I had my STS-427LXH together and making my first test run in about 2 1/2 hours. The ground was still wet from an earlier rain but it had no problem picking up the pine straw that I have to deal with in my yard. (Have I told you how much I hate pine straw?) Of course, I put the adjustment down to the 2 setting which is kind of low but, hey … it works. I’m looking forward to tackling the entire yard on the next dry day. Many thanks.
Might I recommend that you clearly delineate those unneeded panels for purchasers of the STS-427LXH? The instructions don’t address them, but because they exist in the skin pack, most purchasers would naturally assume they are to be used somewhere. One single line (“Panels 8 and 9 are not used for the xxxx model(s)”) would help to alleviate a great deal of confusion and frustration.
Thank you for your recommendation Lori, that will definitely eliminate the ambiguity between the parts for the two models. I apologize for any confusion and frustration that this oversight caused you during the assembly process. We try very hard to make the assembly process as straightforward as possible, but sometimes we drop the ball. I’ll relay your suggestion to our engineering department right away. Thanks again, we really appreciate your feedback!
We are having trouble getting the sweeper to pick up leaves. Is there some adjustment we could try?
Hi Sherry,
If the side height adjustment handle is set on the lowest setting and the sweeper will still not pick up, you’ll need to adjust the hitch clevis position. If none of the hitch clevis positions resolve the issue, flipping it over will give you 4 more adjustment positions.
Thanks for the info on STS-427LXH sweeper hardware panels 8 & 9. I couldn’t figure out what step I missed. I’m glad you created the video. The sweeper works well.
Glad we could help!
I just got my new sweeper today, my wife suggested if they put the numbers on the parts, it would be easier to understand directions. I agree. We went to the video which helped. I also didn’t know where the spare parts went.
Hi William, that’s a good idea for simplifying the assembly process. Glad the video was able to help! The leftover parts you mentioned are actually for a different model sweeper, they just share the same push-pack in order to minimize cost. Thanks for the feedback!
I am having problems collapsing the hamper for my 427LXH…it says to detach the hamper from the brush housing (no problem)..then to collapse the hamper by “unlocking the spreader bar assembly (push forward)”..there is no diagram for this and this is where I am lost..how do I unblock it? and wouldn’t I have to remove the spring rods? Thanks
Hi Andrew, you are correct, you will need to remove the spring rods to collapse the hamper on the STS-427LXH. You may have a previous version of the manual that covers both the STH-420BH and the STS-427LXH. Once you remove the spring rods the hamper should collapse easily. If you have any other questions, please don’t hesitate to ask. I apologize for the confusion. Thank you, Brad